What would a good vacation be without new toys to test out and play with?!! Yes, I kept my UPS man plenty busy in the couple of weeks before I headed out. The biggest purchase was my solar system!

Actually, this pic is a combination of solar items—the panels are the new purchases, the little black gizmo at the corner of my lawn mat is the solar recharger for my
LED rope lights that I’ve had a few years now. They put out quite a few hours of light at night and are great when boondocking!

Now, back to those new solar panels… It took a few years to finally decide that I needed them (ultimately, yes, I’d prefer to keep my quiet little spot in the wilderness
quiet and keep my loud and smelly generator use to a minimum). The next decision was to determine mounting. I had read a
very intriguing post by Jim over at
Imperfect Destiny last year that really made a portable system look quite appealing, so for now, I’m following his ideas and will keep them portable. This decision worked out great for my Imp Lake campsite above (where my RV was mostly in shade all day)!
I initially ordered a pair of 100 watt Grape Solar panels from Costco (just like the ones AM Solar sells). Perfectly fine panels, but at nearly 18 lbs each, they just felt a bit too heavy and big for me to realistically carry in and out of the View. So more internet searching revealed
these 60 watt panels with built-in tilt bars—less than 13 lbs each and a bit smaller too.

While it takes 2 of these panels to equal 1 of the Grapes, I still felt the smaller/lighter handling of each panel would be worth it for me in the long run (I stow these bungeed together in the View’s overhead bunk area).
The panels use standard MC4 solar connectors with 2 joiners to run them in parallel.

For the inside part of the system, I got a
Morningstar Sunsaver MPPT controller and a
RM1 remote meter from Northern Arizona Solar.

The meter is a bit confusing (as the documentation doesn’t fully match what appears on the read-outs), and the battery monitor portion does not seem nearly as robust as the Tri-metric meter that Jim and many others use. But for now, it’s an improvement over my previous bare-bones voltmeter, and seems to be showing a pretty good display of amp hours being sent to the battery bank by the solar panels, so it will do fine for now.

I wasn’t using much power when I was at Imp Lake (didn’t need to run the furnace, and the days were long and sunny), so the 120 watts of solar were easily able to recharge my batteries each day. But I plan to buy 2 more of these panels before any winter snowbird boondocking (so I’ll have a total of 240 watts). My idea right now is to conventionally mount 2 of them on the roof, and then leave 2 of them portable to tilt and point where ever needed. But if I get tired of carrying the portable panels in and out, I can always decide to add them to the roof as well.
Last winter, I noticed my 1-year-old Sam’s Club 6v golf cart batteries not holding a charge as well as they did originally (I must have let them get too low a few times), so I decided to move up to AGM batteries to no longer worry about refilling water in the batteries. Lifeline batteries are the most highly-regarded (and most expensive), but I decided to try these
$160 6 volt Duracells first to see if they might last longer than my Sam’s Club batteries. So far, so good on this trip!

Now on for my two new favorite additions--
I posted last year about using
2 self-inflating camp mattresses to make the View’s jackknife sofa bed more comfortable and even. They did a fine job, but could sometimes be a bit too firm and not contour to my body the way a real mattress would (I sleep on my sides). The camp mattresses also weighed 6 lbs each and were pretty bulky to stow when not in use. I happened to run across this new interesting backpacker’s mat a few weeks ago and couldn’t wait to try it out!
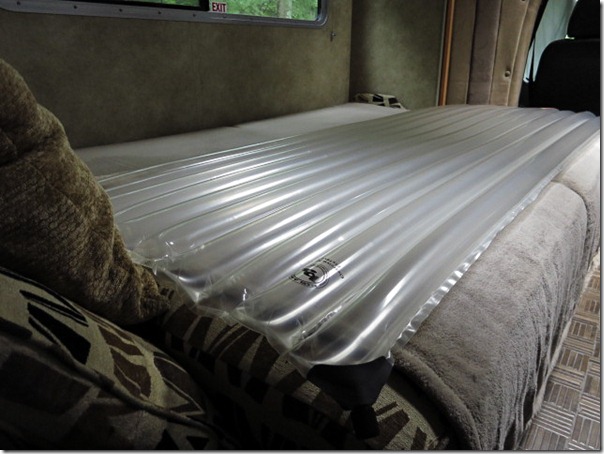
It’s a
Big Agnes Clearview Air Pad and deflates down into a tiny stuffsack about the size of a small coffee can and weighs just over 1 pound. At first, I wasn’t too sure about it. The clear rubbery plastic didn’t look that sturdy and it’s not self-inflating (you can use a 12v air pump or simply blow into the open screw valve to inflate it). But after one night…wow! This little pad is THE BOMB! Just the right amount of cushiony air, and the slender long air chambers very nicely “give” to your body’s shape for a good night’s sleep. The texture is slightly rubbery so the pad doesn’t move around as much as the previous mats either. Topping it off with my 2” memory foam squares (cut so they fit into 4 pillowcases and can top the bed at night or sofa during the day), and combined with my Travasak sheets/comforter, made for the most comfortable nights sleep I’ve ever had in the View!
My final new toy to play with on this trip was an updated
Verizon 4G Mifi 4620 cellular modem. The previous “1st generation” 4G Mifi got lots of complaints from users saying it constantly needed to be rebooted and was never keeping a connection reliably (especially when going from 3G to 4G signals). Well, this new 2nd generation Mifi performed flawlessly! No reboots, no flakey connections and never a need to hook up my external Wilson antenna to improve signal strength. I’ve been a very happy camper working with this new Mifi on the road!


