
Ever notice that many solo women RVers do not have towed vehicles (or “Toads” as they’re affectionately called)? Seems like almost all of us start out with an aversion to towing a car—“keep it simple” we say, “don’t want to overly complicate things.”
Certainly, towing a few thousand pounds behind your RV does add some complexity and limitations to your routine. The biggest drawback: you can never back up without unhitching the toad first. While this can be a major limitation with longer motorhomes, I’ve found that with my 24’ View, I’m still able to U-turn out of most situations and navigate smaller gas stations almost as easily as when not towing. I do have to avoid small parking lots that only have 1 entrance/exit though.
Hitching and unhitching a toad can be done in less than 5 minutes once you get the hang of it. There are a variety of towing solutions and a variety requirements for each particular tow car, so some of the steps below may not apply to your setup, but in general, these are the main ingredients and steps I follow.
The RV-side:

Tow bars either usually stay on the RV or stay on the toad. Many RVers like the former as you can collapse and cover them when not in use, while leaving the front of your tow car free of any large, heavy towing equipment (but the car-side tow bars are certainly quite cheap!).
Many RV hitch receivers are higher than most small tow cars, so a drop hitch extension is needed (the black thing under the license plate that the silver tow bar attaches to). I also have 2 hitch locks to keep deter theft—one locks the drop hitch to the RV, and the other locks the tow bar to the drop hitch. The tow bar weighs about 40 lbs, and drop hitch another 15, so I usually just keep it on the RV all the time rather than fool with removing it (I do unplug and stow the blue power cord – those things are easily stolen if not watched!)
The Car-side:
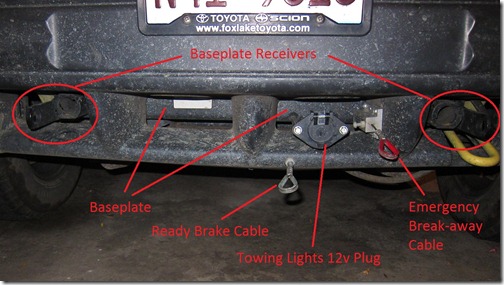
Ok, forgive my tow car’s dirty bumper! Click this picture to view larger. I’ve got a Blue Ox baseplate with a ReadyBrake braking system. The black baseplate as well as it’s 2 black receivers are concealed behind the bumper and nearly invisible when driving around town. Some other baseplate systems, such as Roadmaster, only mount their receiver components to the car and have their main horizontal bar out in front of the bumper. While some folks (or some vehicles) find this more preferred, I didn’t want to fool with a heavy long bar to attach/remove and store, so chose Blue Ox instead.
The Silver and Red Loops are part of my ReadyBrake system. There are a dozen different braking system designs for towing cars—some tap into the car’s brake system to activate it’s hydraulics, others are portable “lunchboxes” that you place on the floor between the driver’s seat and brake pedal. These boxes have an arm that clamps onto the pedal to activate the brake.
Since my Tracker requires that I run the engine and put the transmission into gear every 200 miles of towing, I knew the portable box system would not be practical, so thought the ReadyBrake would be the least intrusive and easiest system to go with. It basically is a small cable that runs from the silver loop you see pictured to the back of my car’s brake pedal. When the tow bar’s surge mechanism compresses (i.e. when the RV starts braking or goes down a big hill), it pulls on this silver loop to pull the car’s brake pedal. Simple, and no electric, air, or hydraulics required.
As an added safety precaution, a secondary brake cable is installed (the red loop) which will activate the car’s brakes if it should ever “break away” from the tow bar and RV.
The final car-side component are towing lights. Here, too, there are a variety of solutions available. For my car, the installer put a secondary bulb into each rear tail light housing and ran separate wiring between these new bulbs and the 12v plug on the front bumper.
The Goodie Bag:


For all the small connectors and tools, I keep these in a zippered canvas
tow hitch bag. This bag stays in the car all the time and keeps things from getting lost.
My hands used to get dirty when hitching up until I started using a pair of cotton garden gloves. Duh! Also, the first time I went to unhitch my car and found the bent pins hard to remove (which hold the tow bar to the car), I realized I needed to also carry a rubber mallet to give those stubborn pins a whack. All of the other items shown came with the Baseplate or Tow Bar.
Hitching Process:
1. Prepare the RV-side for towing:

The vinyl tow bar cover just has a Velcro flap and is easily removed to reveal the tow bar and various cables. I unwrap the cables to free up the bar, and then tilt the bar upward and spread it’s arms apart.

2. Prepare the Car-Side for Towing:
I get my Goodie Bag out of the car, put my gloves on, and take each of the large Blue Ox attachment tabs and insert them into the baseplate receiver holes. The tabs are very heavy-duty (about 5 lbs each), and simply twist and lock into place.


I then drive the car into position behind the RV. I’ve become familiar enough now to know when I see the front hood of the car showing right below the RV license plate, that I’m close enough for the extendable tow bar arms to reach the car.

3. Extend the Tow Bar Arms to rest on the Baseplate tabs:

Now if I’ve positioned the car right, the tow bar arms will be able to rest on top of the silver baseplate tabs protruding from the car. Notice here the car is at a slight angle to the RV because one arm is extended further than another. This is why you want to pay more to buy a tow bar with adjustable extension arms—no need to be super precise when positioning the car!
Note also that the red levers on the tow bar are in the out position to allow the arms to extend freely.
4. Connect the Tow Bar to the Car:
Now I take the small connectors out of my goodie bag, and connect the arms to the silver attachment tabs using the bent pins.
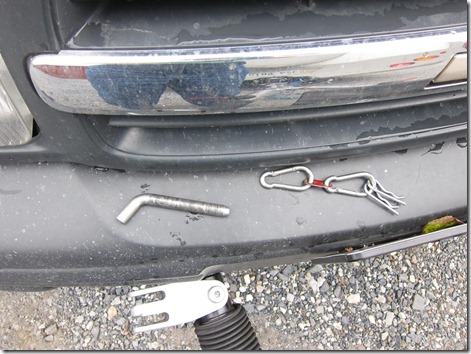

Once the bent pins are in place, I put a hairpin cotter on each bent pin to keep it locked in place.


5. Connect the Cables:
Now that the car is attached to the tow bar, it’s time to connect all the remaining cables.
I take the pair of carabiners to attach the emergency break-away cables together:
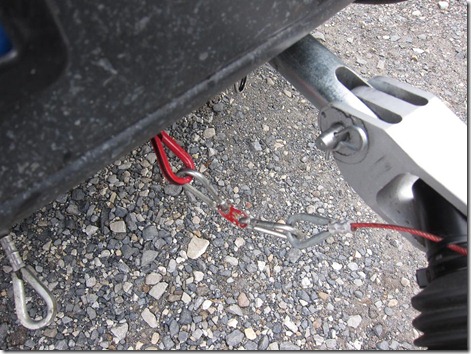
Then clip the carabiner from the black brake cable to connect the ReadyBrake surge mechanism to the car’s silver brake cable loop.

I next plug the blue 12v power cord into the 12v plug on the car’s front bumper (to power the car’s tow light bulbs with power from the RV).

And, finally, connect the 2 coiled black safety cables into the 2 connector holes extending from the baseplate. These safety cables keep the RV and Car connected to each other if the hitch or tow bar connections should ever fail.

When everything is finally connected, it looks like this:


Notice now that I turn the red arm levers forward. This will prepare the arms to lock in place once they fully extend. Eagle-eyed observers will see that I don’t have my safety cables “cris-crossed” beneath the tow bar. While this would be the recommended way to connect them (so that if the tow bar ever fails, it will be “cradled” by the cables and won’t scrape the ground), my cables are still new and rather stiff, so I prefer right now just to connect them in parallel. There is a metal loop beneath the center of the tow bar, that I feed the blue power cable through to keep it from drooping on the ground. I’ll eventually use it for the safety cables as well once they stretch out more.
6. Ladies (and Gentlemen), Start Your Engines!:
Now it’s time to get the toad ready for “free wheelin’”. Each vehicle is a bit different on how to do this. Many cars just have you place the transmission in Neutral, but READ YOUR CAR’S MANUAL before ever attempting to flat tow it behind a motor home! Otherwise you’ll be buying yourself a new transmission!

My 4WD automatic transmission 2003 Chevy Tracker has a Hi/Low Transfer Case, so in my situation, I start the engine, put the Drive Transfer case into Neutral, and leave the Transmission still in Park. Although this sounds completely crazy, you’re able to hear and feel the Transfer Case disengaging the drive shaft from transmission, so once you let up on the brake pedal, the car’s wheels are now free to roll.
With the Transfer Case still in Neutral, my car’s manual instructs me to put the Transmission into Drive, rev the engine to 2000 rpms for approximately 2 minutes, and then return the Transmission to Park. This step allows all the critical parts to get lubricated before taking off down the highway. I must repeat this step every 200 miles (which happens to nicely coincide with gas station or rest stops anyway).
Once finished with that step, I turn the engine off and put it into the “1st Accessory” position and leave the key in the ignition (this allows the steering wheel to stay “unlocked” and front wheels to turn side to side). I had a spare key made just for this purpose so I could carry the remote lock keyfob with me to lock the car. I also put a sunshade up to keep the car interior from getting too hot and to further visibly show the car is being towed.


7. Final Inspection
Once the toad is ready to roll, it’s time to start up the RV, check the lights, and re-check all towing connections.
It’s ideal if you have a second person to stand behind the toad and confirm that each turn signal and brake lights work, but since I often travel solo, I turn the RV’s hazard lights on instead.


Notice my Tracker’s amber turn signal lights do not light up—only the dedicated secondary tow light bulb (in the lower red casing) does.
I drive the RV forward a few feet and then give everything a final inspection, making sure that the tow arms have now fully extended and locked into place.

Back in the RV, I turn the rear-view camera on (and keep it on) to ensure that there are no problems (i.e. tire blowouts on the toad, disconnected cables, etc)

Ready to roll! I assure that it’s now taken longer to read this post than it actually does to perform these steps!
Disconnecting The Toad:
So, now for a few parting tips on how to disconnect your toad properly. You’d think it’d simply be a case of reversing the steps above (and indeed it is), but be sure to remember 2 important tips (learned the hard way from Yours Truly)!
- Before unhitching, remember to put the car back in gear (or set the parking brake). Yes, I made this dumb mistake one day. Thankfully, my driveway only has a slight slope and my driver’s door window was open, so I was able to run and reach in to pull the parking brake to halt my runaway Tracker! Gave my neighbor quite a good laugh with dumb move!!!
- Turn your toad’s ignition off if staying parked and hooked up for an extended period of time. I once came home from a trip so exhausted that I left the toad hitched up to the motorhome for a couple of days before unhitching it. Big mistake! By leaving the key in the toad’s accessory ignition position that long, I had managed to suck all the power out of the battery and it wouldn’t start! Thankfully, I was home and could charge it up again, but it was certainly another bone-head move on my part!
Can I Tow a … With a …?
Legal disclaimer section!
Before towing anything with your Motorhome, check it’s weight/capacity stickers to confirm your Towing Capacity, Hitch Capacity, and GCWR (Gross Combined Weight Rating) to ensure it can safely handled your car’s weight. Check the weight sticker for your car too!
Just because your car’s weight might be fine, that still doesn’t give you the green light to tow it. In fact, fewer and fewer modern cars these days are able to be “flat-towed” or towed “4-wheels down” (meaning all wheels rolling on the pavement rather than via a car trailer or towing dolly).
The best references to check whether or not your car can be towed this way are as follows:
- Your vehicle’s Owner’s Manual (the definitive source above all others)
- Motorhome Magazine’s Annual Dinghy Towing Guide (published each Spring for that particular model year)
- Remco Towing’s Application Charts (Remco makes Lube Pumps that allow certain vehicles not listed on Motorhome Magazine’s guide to still be flat-towed if their Remco pump is installed).
Also, it’s wise to read towing-related posts on popular RV’ing forums (such as the Dinghy Towing forum on RV.net) and ask fellow RV’ers you meet about their first-hand experiences towing your particular model vehicle. A few newer-model Fords recently had some problems with transmission failures when being flat-towed (Ford has been addressing them). But while Ford’s Owner’s Manual, and both guides above showed these vehicles to be approved for flat-towing, actual owner experiences posted on forum sites such as RV.net revealed some major problems. So, do your homework carefully and thoroughly before making the investment and hitching up!
How Much Does it Cost? What’s the Impact to MPG?
Two of the most-common questions I get!
Cost-wise, most dinghy towing setups (parts and installation labor) typically run in the $3000 – $3500 range, about half the cost will be parts and other half labor. This can be higher if you buy your parts retail from an RV dealer (rather than online), or choose the most expensive tow bar and braking solutions.
MPG impact has been amazingly minimal for me. When towing the Tracker through the flat Midwest, my View’s MPG is only minimally reduced when towing (less the 1 MPG difference for the 3000 lb Tracker). In the Rocky Mountains this past summer, my climbing speeds were obviously slowed with the added weight, but even at this extreme, the MPG difference was minimal (perhaps 1.5 MPG) because every hard uphill climb had an effortless downhill coast.
Toads are Fun!

So sure, the above toad is a whole lot cuter, cheaper, and easy to hitch onto the back of an RV than another gas-guzzling vehicle! But I like all the terrific places my little Tracker has been able to get me to (where my RV alone could not). Toads are fun!


